Start your cross-border journey
Contact us now

Website development customer service

Customer Service


Open Shopify's backend and on the Online Store Online Store - Navigation Navigation page, open the Shopify Navigation Settings page as shown below.
![图片[3]-独立站Shopify菜单Menu的创建与设置 | Shopify教程 | 歪猫跨境 | WaimaoB2C-歪猫跨境 | WaimaoB2C](https://img.waimaob2c.com/wp-content/uploads/Shopify-Navigation-WaimaoB2C-230326-1.jpg)
Shopify system generates two menu groups by default, one is Footer Menu, which is the menu item at the bottom of the front page of the website, and one is Main menu, which is the menu option at the top of the website. If necessary, click the Add menu link in the upper right corner of the Add menu can create other menu groups, such as Sidebar menu, put into the website sidebar. Although the name is Main menu, footer menu, but in fact we can not be limited to the name of the menu, in the theme settings can be put on the top of the front of the website Footer menu, just to facilitate the management, we set one by one corresponding to the OK.
Click Main menu to enter the top menu item adding and managing page. As shown in the picture below, we can change the Title to make it easier for you to recognize the management. According to my own habit, I will change Main Menu to Header Menu to correspond with Footer Menu, which is convenient for other business to understand when modifying website content. We can even use Chinese to fill in the position of the Header Title directly, the content of the menu's Title text box is just for our own internal management convenience, and will not be displayed in the website's foreground.
![图片[4]-独立站Shopify菜单Menu的创建与设置 | Shopify教程 | 歪猫跨境 | WaimaoB2C-歪猫跨境 | WaimaoB2C](https://img.waimaob2c.com/wp-content/uploads/Shopify-Navigation-WaimaoB2C-230326-2.jpg)
You can add a link to this menu item by clicking Add menu item in the Menu items panel. Usually the menu item we want to add to the top of the site is the site's product catalog, which is the item we created in the Product Line Collection, so click on the link Link in the pop-up window and select Product Line Collections from the drop-down options.
Then add the product categories we created in Collection to this page in turn. To create a drop-down menu, or a secondary category in Shopify, simply mouse hold and drag the 6 dots icon in front of the Collection name for left, right, up and down in the menu item shown below.
![图片[5]-独立站Shopify菜单Menu的创建与设置 | Shopify教程 | 歪猫跨境 | WaimaoB2C-歪猫跨境 | WaimaoB2C](https://img.waimaob2c.com/wp-content/uploads/Shopify-Navigation-WaimaoB2C-230326-8.jpg)
Currently shopify supports up to three levels of dropdown menus, to support more levels of dropdown menus, you can search for "Mega Menu" to install the relevant application to realize.
![图片[6]-独立站Shopify菜单Menu的创建与设置 | Shopify教程 | 歪猫跨境 | WaimaoB2C-歪猫跨境 | WaimaoB2C](https://img.waimaob2c.com/wp-content/uploads/Shopify-Navigation-WaimaoB2C-230326-9.jpg)
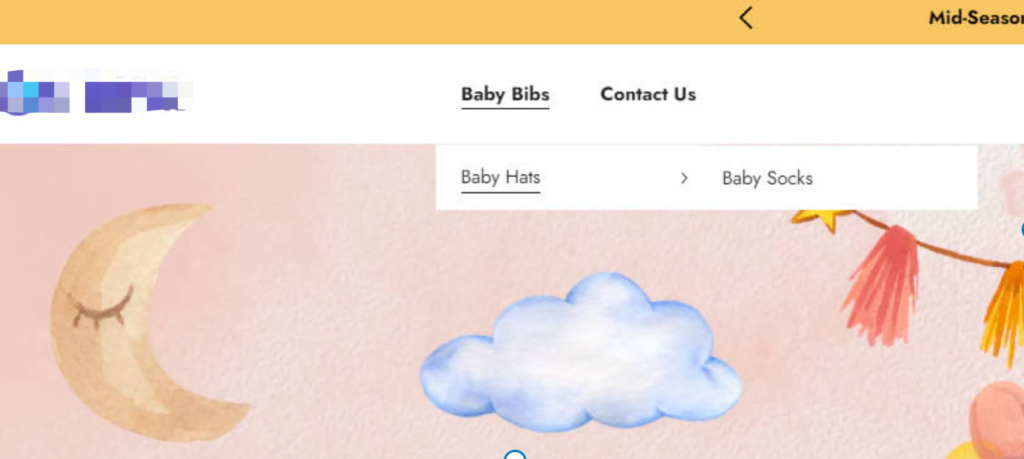
Save the menu after it is set up. Open the website frontend, you can see the menu items we just added to the Main Menu. The three-level menu is shown in the following figure:

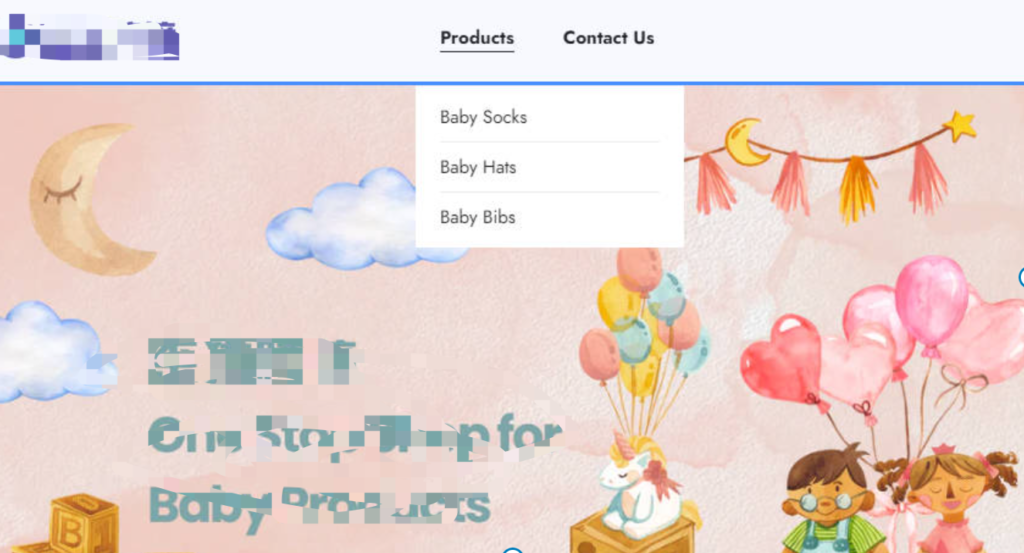
Sometimes, we want to add plain text menu items without links in the menu bar, click Add Menu Item, enter "#" in the link field, fill in the name with the name of the menu you want, and then add it to the menu bar. According to our settings shown in the figure below, in the front of the website, after the customer clicks on the menu item of Products, the menu items of each product series will appear without any page jump.
![图片[8]-独立站Shopify菜单Menu的创建与设置 | Shopify教程 | 歪猫跨境 | WaimaoB2C-歪猫跨境 | WaimaoB2C](https://img.waimaob2c.com/wp-content/uploads/Shopify-Navigation-WaimaoB2C-230326-10.jpg)
The foreground display effect is as follows

If you set up a good Main menu in the background, but still can not see the menu at the top of the front of the site, you need to carefully read the theme instructions document, and then go to the theme customization settings in the relevant operations, most of the themes will appear in the Header settings, as shown below, you need to select the menu group we want to be displayed at the top of the site, we set up a good menu will appear on the site! front of the website.
Theme customization before unselected header menu lan look

Theme customization after selecting the header menu lan looks like

As with the Main menu, we need to add the Policies policy page that we created earlier, as well as the About us, Contact us, etc. pages from the Page page to the bottom of the site. If there is only one menu group at the bottom of the site, the process is basically the same as for the header menu.
If there are 2 or more menu groups at the bottom of the site, then we need to create new menu groups in the backend to add them to the bottom menu bar in order. For example, the Ella theme I'm using provides 3 menu groups at the bottom of the site by default. We can add more menu groups through the theme customization function, or delete the unused menu groups.
![图片[12]-独立站Shopify菜单Menu的创建与设置 | Shopify教程 | 歪猫跨境 | WaimaoB2C-歪猫跨境 | WaimaoB2C](https://img.waimaob2c.com/wp-content/uploads/Shopify-Navigation-WaimaoB2C-230326-5.jpg)
After determining the number of menu groups, the next step is to add and set up the corresponding menu groups in the Shopify backend:
![图片[13]-独立站Shopify菜单Menu的创建与设置 | Shopify教程 | 歪猫跨境 | WaimaoB2C-歪猫跨境 | WaimaoB2C](https://img.waimaob2c.com/wp-content/uploads/Shopify-Navigation-WaimaoB2C-230326-6.jpg)
After saving the changes, some themes will have our newly added menu items visible directly at the bottom of the frontend of the site. Similarly, if you don't see any changes at the bottom of the frontend of your website, it means that you have to make further settings in the theme of your website. As shown below, in the footer options, we need to add the menu groups we added in the previous cloth, one by one, to the bottom of the website.
![图片[14]-独立站Shopify菜单Menu的创建与设置 | Shopify教程 | 歪猫跨境 | WaimaoB2C-歪猫跨境 | WaimaoB2C](https://img.waimaob2c.com/wp-content/uploads/Shopify-Navigation-WaimaoB2C-230326-7.jpg)
![图片[15]-独立站Shopify菜单Menu的创建与设置 | Shopify教程 | 歪猫跨境 | WaimaoB2C-歪猫跨境 | WaimaoB2C](https://img.waimaob2c.com/wp-content/uploads/Shopify-Navigation-WaimaoB2C-230326-13.jpg)
Next, let's talk about Shopify's Link Redirection URL Redirects feature. Clicking on View URL Redirects URL Redirects in the image above opens the page shown below. The purpose of a link redirect is to redirect a link that was there but is now dead to a new link that can now be opened normally.
![图片[16]-独立站Shopify菜单Menu的创建与设置 | Shopify教程 | 歪猫跨境 | WaimaoB2C-歪猫跨境 | WaimaoB2C](https://img.waimaob2c.com/wp-content/uploads/Shopify-Navigation-WaimaoB2C-230326-14.jpg)
Let's say you originally used Woocommerce to build an independent website, and now you change the website system to Shopify, then after the product information above the original Woocommerce is migrated to Shopify, you need to redirect the link address of the original product on the original Woocommerce to the corresponding product's link address on the new Shopify website, then URL Redirects can be used to realize this. link address, then URL Redirects can be realized.
However, one scenario here is to use URL Redirect to generate our own short link service for Shopify instead of using Bitly to generate short links. It's easy to do, just type in any word in Redirect from and redirect from will be seen as our own short link.
As shown in the picture below, I fill in bfcm in Redirect from, my website domain name is shopify.waimaob2c.com, then my short link address is shopify.waimaob2c.com/bfcm, when open shopify.waimaob2c.com/bfcm in browser, the page will automatically jump to any link we enter in Redirect to. The link address in Redirect to is usually the link address of the complete product we want to promote.
![图片[17]-独立站Shopify菜单Menu的创建与设置 | Shopify教程 | 歪猫跨境 | WaimaoB2C-歪猫跨境 | WaimaoB2C](https://img.waimaob2c.com/wp-content/uploads/Shopify-Navigation-WaimaoB2C-230326-15.jpg)
The Import and Export operation in the upper right corner of the URL redirection settings page can help us add or modify URL redirection rules in bulk using the CSV form. The whole operation is very simple, Redirect from is the original link address, Redirect to is the new link address.
![图片[18]-独立站Shopify菜单Menu的创建与设置 | Shopify教程 | 歪猫跨境 | WaimaoB2C-歪猫跨境 | WaimaoB2C](https://img.waimaob2c.com/wp-content/uploads/Shopify-Market-WaimaoB2C-230407-21.jpg)
Shopify Product Collection and Search Filters are filters that appear in the sidebar of the product collection list page and on the search results page. There are two filters by default, Availability and Price, and when you click the Add button, you'll be redirected to the Shopify App Marketplace to install the app. However, the app has a low rating, and if you want to remove Availability and Price, you have to install the app first. If you remove Availability and Price and then uninstall the app, Availability and Price will not be added to the background.
Of course, if we don't use the filter, we can also hide the filter directly in the theme customization settings or hide the sidebar and we won't see this filter.
![图片[19]-独立站Shopify菜单Menu的创建与设置 | Shopify教程 | 歪猫跨境 | WaimaoB2C-歪猫跨境 | WaimaoB2C](https://img.waimaob2c.com/wp-content/uploads/Shopify-Navigation-WaimaoB2C-230326-16.jpg)
The display of the filter on the Product Listing screen is shown in the following figure:
![图片[20]-独立站Shopify菜单Menu的创建与设置 | Shopify教程 | 歪猫跨境 | WaimaoB2C-歪猫跨境 | WaimaoB2C](https://img.waimaob2c.com/wp-content/uploads/Shopify-Navigation-WaimaoB2C-230326-17.jpg)