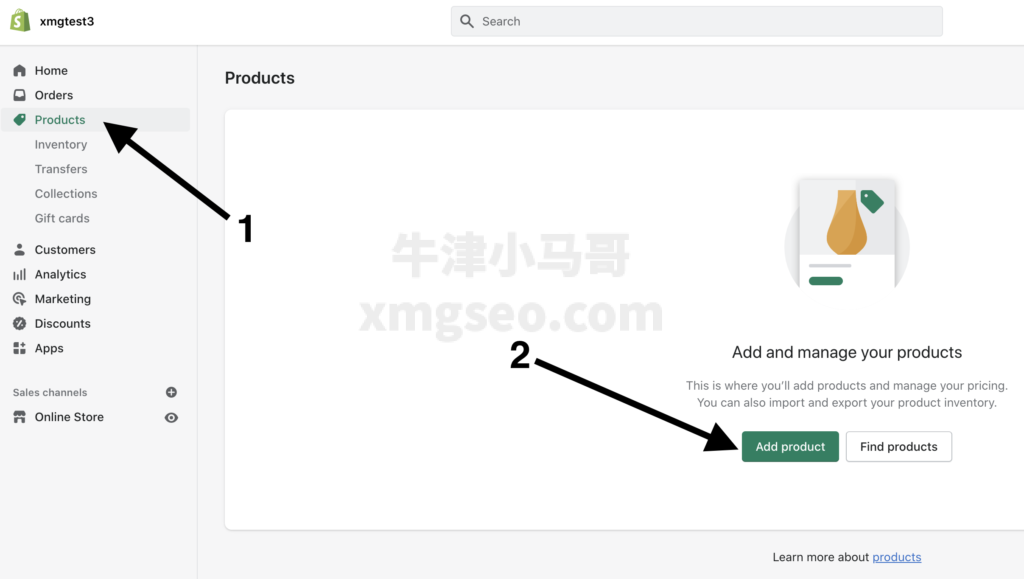
This post will teach you how to shelve products in Shopify.
- First you need to log in to your Shopify store.
- Then select Products in the backend and click Add Product.
 Shopify Backend Upload Products
- Enter the title of the product and a detailed description of the product. The more you enter here in the detail description, the better, and you can use super long images, similar to Amazon's A+ page.
 Setting up product titles and detail pages
- Upload your product images, jpg or png is fine. shopify will automatically optimize your images into next-gen format (webp). You can also choose 3D images if you have generated them.
 Upload Product Images
- Set the price of the product, and if you want to change the currency of your Shopify store, you just need to switch it in the backend.
 Setting the product price
- Set the product type, you can click add custom type to add more categories.
 Select Product Type
- Set the seller's vendor and collection for the product, you can write your own brand name in the vendor field, and the collection category you will only have one home collection by default. if you want to add a collection, you need to read my other tutorial.
 Setting up product categories and brands
- Set the SKU and inventory of your products.SKU is the product number. It is the ID of your product, you just need to make sure that each product's SKU is unique. I would also recommend that you don't set the inventory and turn off the track quantity option. This way, your product inventory will not be monitored and will always be available for purchase.
 Set product sku
- Then you need to set the product logistics information. Here the product weight and shipping place you can not fill in, if you set up the logistics in the background are package shipping. I personally recommend to set up the package mode, this way your weight will not be important again, you can default to 0.
 Setting up product logistics information
- You need to set the variants of the product, if any. If your product has other colors and sizes, you'll want to check the box below This product has options. then you'll see Option name, this is the name of the variable, for example the color Color. next are the options, for example blue blue, red red. if you have more than one variant, for example different colors and sizes you can add more variables by clicking on Add another option to add more variables.
 The process of setting up a product variant
- Finally you need to change your product status to Active if you are sure you want to start selling. Otherwise you should keep your product status as Draftdraft.
 Setting the product status


 Shopify Backend Upload Products
 Setting up product titles and detail pages
 Upload Product Images
 Setting the product price
 Select Product Type
 Setting up product categories and brands
 Set product sku
 Setting up product logistics information
 The process of setting up a product variant
 Setting the product status